Creating a back up of your Raspberry Pi OS (Raspbian) is a great skill to know.
One of the great things about using a Raspberry Pi is how easy it is to reset the whole system. If you’re working on a project and you completely mess something up, it only takes minutes to reinstall the operating system and start again.
Swift restoration is just one thing that makes the Raspberry Pi ideal for experimentation.
This constant state of being ‘ready-to-refresh’ can be a double-edged sword, though. The Raspberry Pi is a useful microcomputer: you can set up email and use the internet, write documents, install and use coding tools, and work on all manner of long-term projects.
If you use a Raspberry Pi for a long time, you’ll want to think about a backup solution. A backup enables you to restore the Raspbian OS and your files.
Fortunately, there are several different ways to go about backing up the OS and your files.
Back up option 1: Copy the SD card image
The simplest way to back up your Raspberry Pi is to copy the entire SD card as an image.
This technique is the reverse of flashing your SD card when installing an OS to it. Instead of copying an image file from your computer to the SD card, you copy the entire SD card to an image file on your computer.
This is, in fact, how image files are created in the first place.
Power down your Raspberry Pi and remove the SD card. Place it into an SD card reader and connect it to your computer.
Open a Terminal window on a Mac or Linux computer, and enter df. Take a look at what drives you have on your system. Now attach the SD card to your computer, and enter df again.
Spot the newly mounted drive: on a Linux machine, it will be something like /dev/sdb1, and on a Mac it will say /dev/disk2s1. The numbers may be different, so be sure to check carefully.
On Linux:
sudo dd bs=4M if=/dev/sdb of=raspbian.imgOn a Mac:
sudo dd bs=4m if=/dev/rdisk2 of=raspbian.imgYou can then use the raspbian.img file to restore your entire operating system (in its current state) to an SD card using dd in reverse, or by using an app such as Etcher (etcher.io) to flash the SD card.
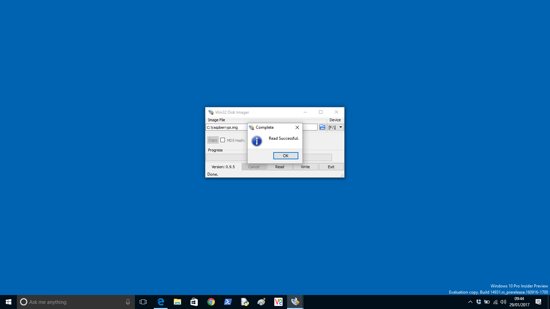
In Windows, you back up the SD card using Win32 Disk Imager.

Open the program and click Yes to the security alert window. Enter C:\raspberrypi.img in the Image File text box and click Read. The SD card will be written to the image file. When it says ‘Read Successful’, you can click OK.
Back up option 2: zip the Home folder
The challenge with turning the SD card into an image file is doing it on a regular basis. You have to remove the SD card from your Raspberry Pi, attach it to a Mac or PC, and complete the whole backup.
The second backup option is to back up just your Home folder as a compressed file. Uncompressing the file enables you to browse and restore individual files and directories. Use the Terminal on your Raspberry Pi:
cd /home/
sudo tar czf pi_home.tar.gz pi
Copy the pi_home.tar.gz file to a USB flash drive for safe keeping.
Backup option 3: Schedule backups
It is possible to schedule backups manually by scheduling the tar command as a cron job. See ‘Scheduling Tasks with Cron’.
Some Raspberry Pi users choose to use rsync (magpi.cc/2kgchCH) instead of tar, because this smartly copies updated files rather than the whole system. But you need to create an exclude file that ignores the contents of system folders. Take a look at this Stack Exchange discussion if you’re interested.
An easier approach is to use a free program called Déjà Dup. This automates rsync and gives it a user-friendly interface. It’s an easy program to use, and you can back up your Raspberry Pi using Amazon S3, SSH, FTP, or by copying the files directly to a flash drive.
You can pick directories to include and exclude, and it’s easy to restore backups. Déjà Dup is installed by default on Ubuntu, and is easy to install in Raspbian:
sudo apt-get update && sudo apt-get upgrade
sudo apt-get install deja-dup
Now you’ll find a new program called Backups in Menu > Accessories.
Click on Folders to save and check that Home (pi) is listed. Folders to ignore should include Rubbish Bin.
Now click on Storage Location and change Amazon S3 to your flash drive.
Go back to Overview and click Back Up Now. Déjà Dup will start the first backup of your Home folder.
You’ll be asked if you want to enter an encryption password. This is a good idea for security. Enter the same password in the Encryption Password and Confirm Password fields. Click Continue.
The first backup may take a while, depending on the size of your Home folder.
When Déjà Dup has finished backing up successfully, you can set up a schedule. Set the Off button to On. Click Scheduling and change Week to Day.
Backup will now store the contents of your Home folder to the flash drive on a daily basis, ready to be restored whenever you need it.
Restoring back up files on a Raspberry Pi

If you’ve had a total system failure and had to wipe your SD card, you’ll need to reinstall Déjà Dup (follow the instructions earlier).
Make sure your backup flash drive is attached to the Raspberry Pi. Now open Accessories > Backups.
Click Restore to reinstall any missing files or directories. A ‘Restore From Where?’ window will open if you are installing from a fresh Raspbian image. Choose your flash drive using the Backup Location. Click Forward.
Choose the date to pick a backup from which you want to restore and click Forward. You have two options: restore files to original locations and restore to a particular folder. Choose to restore files to their original locations. Click Forward and Restore.
If you entered a password, you have to enter it in the Encryption Password field. Click Continue.
All the files from the Home folder in your previous backup will now be restored. You will see ‘Restore Finished’ when all your files are back. Click Close. You will now find all the files and directories from your Home folder reinstalled.


