
The GPIO Zero library for Python now includes support for making tunes with buzzers, so it’s the perfect opportunity to hack yourself a new door-bell jingle. GPIO Zero v1.5 just came out! It’s got some new features we’re going to use in this tutorial, so make sure you upgrade!
This article first appeared in The MagPi 81 and was written by Ben Nuttall. Ben is the creator of GPIO Zero and piwheels, and is the Raspberry Pi Foundation’s resident Python expert. Click here to subscribe to The MagPi in print; free Raspberry Pi with a 12-month subscription.
Check that your Pi’s online, open a Terminal, and type:
sudo apt update
sudo apt install python3-gpiozero
That will bring in the latest GPIO Zero, and will install python3-colorzero too, as that’s a new dependency of GPIO Zero.
You can check what version you have by typing:
apt-cache policy python3-gpiozero
This will also tell you if there’s a new version available.
Tonal buzzer with GPIO Zero 1.5
One of the new device classes in GPIO Zero is TonalBuzzer, which allows you to play particular tones by setting the PWM frequency. You can play a sequence of notes to make a tune, or you can make interesting sound effects like a police siren by cycling through frequency ranges at different speeds. It’s nothing like the quality you’d get from a speaker, but it’s certainly possible to make discernible tones and jingles. There’s a tonal buzzer on ModMyPi’s new Jam HAT, or you can use a normal buzzer like the one in the CamJam kit, but you’ll get better results if you use a transistor to apply 5 V to the buzzer, like they do on the Jam HAT.
Playing a tune
First of all, open up a Python shell or the REPL in your favourite Python editor and import the stuff you’ll need, then create a TonalBuzzer object on the GPIO pin it’s connected to:
from gpiozero import TonalBuzzer
from gpiozero.tones import Tone
from gpiozero.tools import sin_values
from time import sleep
tb = TonalBuzzer(20)
Now try playing a single note:
tb.play(60)
That will play MIDI note 60 (middle C). You’ll get an ‘ambiguous tone’ warning, but don’t worry: that’s just because the Tone interface allows you to use MIDI notes, frequencies, or musical notation. To be more explicit, you would generally use Tone(midi=60) rather than just 60 or Tone(60). Type tb.stop() to stop it playing the note. Type Tone(60) into the REPL to see its three representations:
<Tone note='C4' midi=60 frequency=261.63Hz>
Try playing a scale:
for note in 'C4 D4 E4 F4 G4 A4 B4 C5'.split():
tone = Tone(note)
print(repr(tone))
tb.play(tone)
sleep(0.3)
tb.stop()
And finally, for effect, let’s try that siren noise we were telling you about:
tb.source = sin_values()
Simply passing in a series of values from the sine wave will make the buzzer continuously alter its frequency from one octave down to one octave up, achieving a siren effect. To speed it up or slow it down, alter the buzzer’s source_delay (default 0.1):
tb.source_delay = 0.01
…or:
tb.source_delay = 0.5
Keyboard control
Now install the inputs library, which is a great utility for reading (amongst other things) key presses in real-time. Open a Terminal and type:
sudo pip3 install inputs
Return to the Python shell, import get_key, and create a dictionary mapping each of the characters on the middle row of your keyboard to a note:
from inputs import get_key
keys = {'A': 'C4', 'S': 'D4', 'D': 'E4', 'F': 'F4', 'G': 'G4', 'H': 'A4', 'J': 'B4', 'K': 'C5'}
Add a loop to look for these key presses and play notes when they’re pressed:
while True:
events = getkey()
for event in events:
if event.evtype == 'Key' andevent.code[-1] in 'ASDFGHJK':
if event.state:
tb.play(keys[event.code[-1]])
else:
tb.stop()
Now press any of the keys A to K and it’ll play a note. You’ve turned your computer keyboard into a musical keyboard! Try playing a tune.
Your own door-bell jingle
We worked out the tune for the Pink Panther theme. Use this, or feel free to take this opportunity to create your own, using MIDI notes or musical notation. Or you could opt for the police siren effect, but that might be more alarming than necessary when it’s just an Amazon order delivery.
For Pink Panther, here’s a function to take a list of notes and durations and play them in sequence.
def play(tune):
    for note, duration in tune:
            print(note)
            tb.play(note)
            sleep(float(duration))
    tb.stop()

tune = [('C#4', 0.2), ('D4', 0.2), (None, 0.2),
    ('Eb4', 0.2), ('E4', 0.2), (None, 0.6),
    ('F#4', 0.2), ('G4', 0.2), (None, 0.6),
    ('Eb4', 0.2), ('E4', 0.2), (None, 0.2),
    ('F#4', 0.2), ('G4', 0.2), (None, 0.2),
    ('C4', 0.2), ('B4', 0.2), (None, 0.2),
    ('F#4', 0.2), ('G4', 0.2), (None, 0.2),
    ('B4', 0.2), ('Bb4', 0.5), (None, 0.6),
    ('A4', 0.2), ('G4', 0.2), ('E4', 0.2),
    ('D4', 0.2), ('E4', 0.2)]

play(tune)
Camera test
The easiest way to initially test the camera is to open a Terminal and type:
raspistill -k
This opens the camera preview until you kill it with CTRL+C. Now back to Python; write some simple code to trigger capturing a photo in a loop:
from picamera import PiCamera
from datetime import datetime
camera = PiCamera()
while True:
input("Press Enter to capture")
dt = datetime.now().isoformat()
camera.capture('/home/pi/{}.jpg'.format(dt))
This will take a picture when ENTER is pressed, and save it with the current timestamp.
Hacking a door-bell with GPIO Zero 1.5
Note: These instructions are for battery-powered door-bells only. DO NOT use a mains-powered door-bell.

Open up the door-bell chime by unscrewing the case to reveal the PCB inside. You’ll notice a white wire with one end unattached (that’s the radio receiver), red and black wires going to the battery pack, more white wires going to the speaker, and another pair of red and black wires going to the LED on the front of the case. When the door-bell is pressed and the signal is received, the LED comes on and the chime makes its sound.
Optionally, you can choose to rewire the power to the receiver so that it comes from the Pi instead of batteries. Since it takes two AA batteries (1.5 V each), it requires ~3 V. You can power it from the Pi by connecting the black wire to GND and the red wire to 3V3 (we soldered outs straight to a 3V3 pin hole on a Pi Zero). And of course, if you prefer your own jingle, you can disconnect the speaker.
Next, desolder the wires going to the LED and connect them to the Pi instead: red to a GPIO pin, and black to GND (you can cut jumper wires in half and solder them to the wires, and connect the female end of the jumper wire to the Pi pins, or even solder the ends directly to the Pi Zero pin holes like we did). It’s best to test before you commit to soldering things together, so take it steady.
Testing the door-bell
Did it work? Let’s see. In theory, you should be able to detect a signal on the GPIO pin you wired the door-bell to, the same way you’d detect a button being pressed. So, back to Python and GPIO Zero:
from gpiozero import Button
doorbell = Button(21)
button.waitforpress()
print("Pressed")
button.waitforrelease()
print("Released")
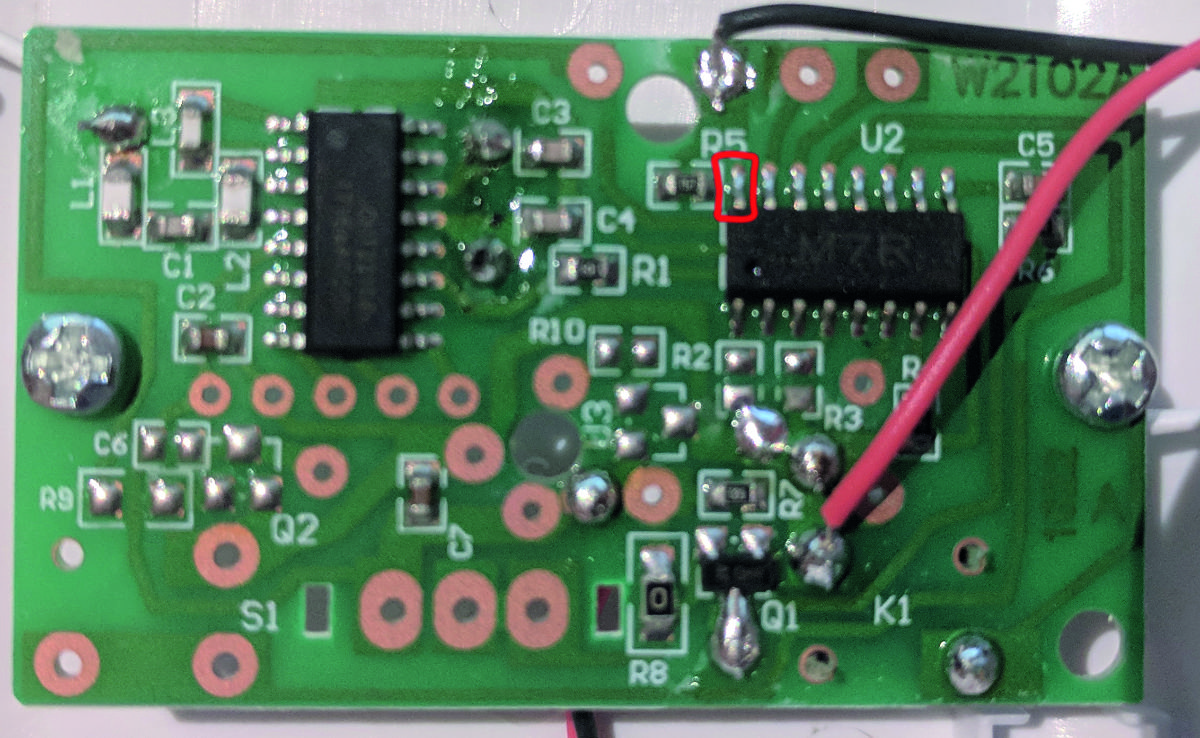
Now press the door-bell, and you should see the message ‘pressed’ when the door-bell is pressed, and ‘released’ once the chime stops playing. If it doesn’t seem to be working, you’ll need to check your wiring. You might need to add a resistor to make sure you detect the change in voltage when the button is pressed. We found that if we wired ours directly to the IC (red square on the picture), the resistor in between would take effect.

Putting it all together
Now let’s put together all the components: the door-bell, the jingle, and the camera. If you want to dedicate a Pi to live in this project, it should probably be a Pi Zero W or 3A+. With a Pi Zero, you can solder the components directly to the GPIO pin holes. You’ll have easier access to the GPIO pins with the 3A+ or another full(er)-size Pi, but it will take up more space, which may be at a premium if you’re trying to fit it all inside a small container (especially the original door-bell receiver enclosure).
Connect your Jam HAT or your buzzer, and solder your door-bell receiver wires and connect them to the Pi’s GPIO pins. Connect the camera and find a way to mount it in place. If you’ve got clear glass on your front door, you can stick the Pi behind or beside the door and have the camera facing out. Make sure all your connections are strong, and the enclosure is keeping everything in place, then connect the Pi’s power supply, making sure it won’t get pulled out. Attach the door-bell to the front door, and put your code together to give it a whirl! See the completed code in the doorbell.py listing.
Run at boot
The important finishing touch is to have your program run at boot. There are a good few ways of doing this, and if you want to find out some alternatives, just ask someone how they tend to do it – chances are you’ll get a different response each time. Your author’s preference for basic script launching like this is cron, either using crontab if you know how, or we’d recommend installing GNOME Schedule, a cron GUI:
sudo apt install gnome-schedule
Just add a new recurrent task that launches at reboot. The task should look something like this:
python3 /home/pi/doorbell.py &
Make it your own
So far we’ve added some basic features – a custom jingle and camera – but there’s much more you could do. If you have smart light-bulbs, you could have it flash the house lights to give a visual indication when the door-bell rings, even when you have music playing. You could have it email, text, or tweet you. How about a push notification to your phone? If you’re feeling ambitious, you could try to identify the door knocker and decide who to let in! The world is your door-bell.
from gpiozero import TonalBuzzer, Button
from picamera import PiCamera
from datetime import datetime

buzzer = TonalBuzzer(20)
doorbell = Button(21)
camera = PiCamera()

def play(tune):
    for note, duration in tune:
        buzzer.play(note)
        sleep(float(duration))
    buzzer.stop()

pink_panther = [
    ('C#4', 0.2), ('D4', 0.2),  (None, 0.2),
    ('Eb4', 0.2), ('E4', 0.2),  (None, 0.6),
    ('F#4', 0.2), ('G4', 0.2),  (None, 0.6),
    ('Eb4', 0.2), ('E4', 0.2),  (None, 0.2),
    ('F#4', 0.2), ('G4', 0.2),  (None, 0.2),
    ('C4', 0.2),  ('B4', 0.2),  (None, 0.2),
    ('F#4', 0.2), ('G4', 0.2),  (None, 0.2),
    ('B4', 0.2),  ('Bb4', 0.5), (None, 0.6),
    ('A4', 0.2),  ('G4', 0.2),  ('E4', 0.2),
    ('D4', 0.2),  ('E4', 0.2)
]

while True:
    doorbell.wait_for_press()
    dt = datetime.now().isoformat()
    camera.capture('/home/pi/{}.jpg'.format(dt))
    play(pink_panther)


