
Traditional private telephone exchanges (PBX) are essential for businesses but come at a premium. Even a simple system can cost thousands to implement. Yet, with the help of Voice over Internet Protocol (VoIP) and the popular open-source telecoms platform Asterisk, the humble Raspberry Pi can match the features of the most expensive PBX systems. Small businesses can get up and running with a two-phone PBX including all the cool features for under £100. At home, why not have phones for your study or kitchen? Leave a voicemail for the dog!
This article first appeared in The MagPi 78 and was written by PJ Evans
You'll need
- 2 × VoIP devices (like the Cisco SPA504G)
- RasPBX Image
- Wired Ethernet and switch
- iOS/Android device (optional)
Step 01 Choose your device
One of the great things about VoIP phone systems is the flexibility. You’re not constricted to a traditional phone. There are three main options. We’re using the popular Linksys SPA941 and Cisco SPA504G SIP VoIP phones. These are older devices, so you can pick them up on auction sites for as little as £10. Many other types of phone are available, including DECT-style cordless. Alternatively, you can use an ATA converter that adapts a traditional PSTN phone to VoIP (although you lose some features). Finally, ‘soft’ phones such as Zoiper can run on iOS/Android devices or on your computer.
Step 02 Network setup
VoIP systems rely on fast networks with low latency to maintain audio quality. As a result, many VoIP devices, including our choice of phones for this tutorial, do not feature WiFi. For best performance, we’re going to wire everything up ‘the old-fashioned way’ using a small Ethernet switch. Most VoIP phones feature a passthrough Ethernet connector, so you can chain other devices without using up all your switch’s ports. The phone can be set to take priority over the data if required (QoS or quality of service) so phone calls still work if you’re downloading the latest Fortnite update.

Step 03 Prepare the phones
If you’ve procured your phones second-hand as we did, they’ll probably need resetting before going any further. VoIP is not one protocol but many working together and the range of possible settings runs into the thousands. To avoid frustration later on, it’s vital to ensure that each phone has been fully reset to defaults and is successfully talking to the network. On this particular phone range, it can be done by going into Setup (the ‘paper’ key) and then ‘Factory Reset’. Allow the phone to restart and then check Setup > Network. All being well, the phone’s IP address will be displayed.
Step 04 Install RasPBX
Asterisk is a popular and mature software implementation of a traditional PBX. The capabilities and features of this product are staggering, especially given its open-source status. To paraphrase: with great power comes great configuration. Asterisk can be hard work to set up. Luckily, some dedicated folks have put together RasPBX, a Stretch distribution with Asterisk installed and including FreePBX, a web-based front-end. Download the image from raspberry-asterisk.org and burn to a microSD card (we used Etcher). Installation requires a few steps and these are detailed in the docs.
Step 05 Set up FreePBX
Once you have the basic configuration in place, open up a web browser then open http://raspbx.local/. If this doesn’t work, establish the IP address of your Pi using a tool like Fing for iOS/Android, as we’ll need it later. FreePBX will now start up and walk you through a simple process where you’ll create an administrator account for the system. When complete, the number of options and screens may be a bit bewildering, but don’t worry: RasPBX is very sensibly set up by default and we don’t need to change anything to get up and running.
Step 06 Create extensions
In VoIP/PBX terminology, each endpoint for a call is known as an extension rather than a phone, as most VoIP phones can handle multiple extensions if desired. Let’s keep it simple with one per phone. From the FreePBX homepage, click on FreePBX Administration, log in as the administrator, then click Applications followed by Extensions. On the page, click Quick Create Extension. Choose a unique extension number (we imaginatively went with ‘1’), and a display name (the user). Repeat for all the extensions you want, remembering to click Apply Config for settings to be reloaded.
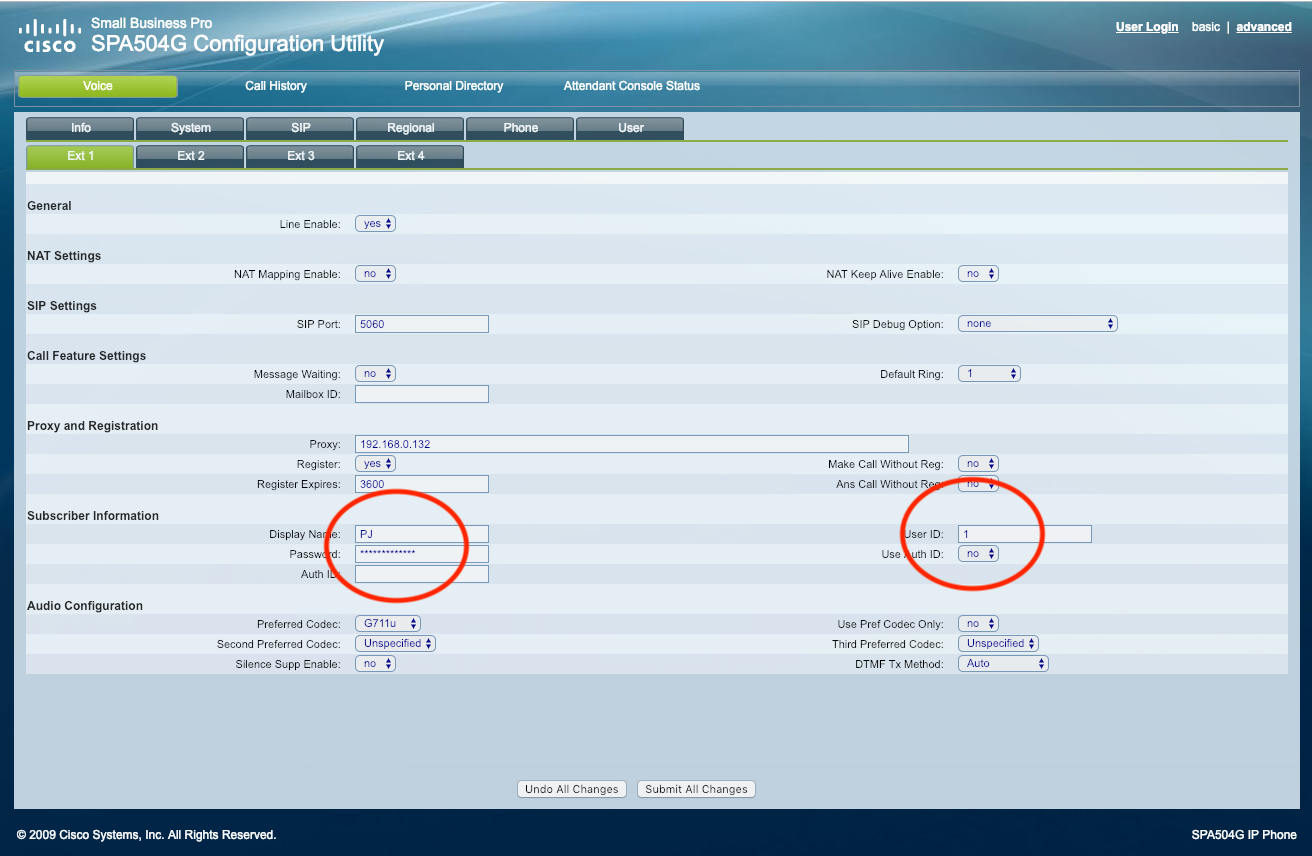
Step 07 Configure the phones
This will vary depending on which phone or device you have. What’s important to know: the IP address of the Pi, the extension number, and the ‘secret’ (password). To get the secret, click the Edit icon against each of the extensions you have created. Now get the IP address of the phone you are using. Chances are there is a web interface. On our phones’ websites, we clicked Admin Login, then Ext 1. We then added the Pi’s IP in Proxy, the extension in User ID, and the secret in Password. After a reboot, and all being well, your phones should register with RasPBX.
Step 08 Make a call!
In the case of the Linksys/Cisco range, a successful ‘registration’ results in a display of green lights indicating the phone is ready to take calls. Let’s say you have extensions 1 and 2. Pick up the receiver of extension 1, press 2 on the keypad and then hit Dial. If everything is running as it should, your other phone will ring. Get someone to answer it (or talk to yourself, we won’t judge) and check audio is flowing correctly. You have a PBX! Try leaving one phone off the hook and calling it: you’ll get a voicemail response ready to go.
Step 09 Voicemail
One of the most obvious features we need is some kind of voicemail facility. RasPBX has you covered. Without any further configuration required, you have a full voicemail system up and running. Access is via a ‘feature code’, a number with special meaning normally prefixed with ‘*’. For voicemail it is *97. In our phone’s menus we were able to map it to the voicemail button. The first time you call, you’ll be guided through setup so you can allocate a PIN and personalised greeting messages. With a bit of advanced tinkering, you can also have the messages emailed to you as attachments.
Step 10 Features, features, features
Now you have the basics up and running, there is plenty to play with. Standard PBX functions such as call transfer, call groups (conferencing), and do-not-disturb are configured to work right out of the box. Have a look around the FreePBX interface, especially the Applications section, and you’ll find additional powerful features. Try call recording, dedicated conference facilities, ring groups (where an incoming call can ‘move’ from extension to extension, or ring several extensions simultaneously), and even IVR (“press one for, press two for”). If that’s not enough, there are even more advanced features available as commercial add-ons.
Step 11 Soft phones
As we mentioned at the start of this tutorial, VoIP phones are not your only option. There are some good ‘soft’ phones available. As the name suggests, these are software-only and designed to run on your smartphone, tablet, or computer. A popular choice is Zoiper, which is available for Windows, macOS, Linux, Android, and iOS. Once installed, add a new account and choose manual setup. Enter your extension number as the user name, your secret as the password, and your Pi’s IP address as the ‘domain’. Click on Register and within a few seconds the phone will be online.

Step 12 Trunking
To send and receive external calls, we need a provider that knows how to take our request and route it on to the public network as well as handle incoming calls. This is known as a SIP trunk and there are many available with varying costs. A popular option is Voipfone, which offers a free trunk service (excluding call charges). A lot of configuration is required to create an inbound and outbound route, but Voipfone has provided detailed instructions to get you started. Your PBX can now speak to anyone, anywhere in the world with a phone.
Step 13 Extend and expand
Even though our little Raspberry Pi can handle many extensions and all these features, there is yet more it can do. Some advanced add-ons for Asterisk are well supported by RasPBX. You can add a call-barring list to avoid scammers and cold-calls, add in a fax-to-email gateway should you need it, and even use a 3/4G GSM USB dongle to provide call routing over the mobile phone network – perfect as a failover measure. There really is very little an expensive PBX can do that RasPBX can’t for a fraction of the price.


