When you’ve made an amazing project, it’s natural to want to share it with other folks (in the hope that they will follow in your footsteps).
Capturing screenshots (images of the desktop display) is a vital component of putting together an effective tutorial. An image is worth a thousand words, and images of your software installation can certainly make it easier for others to understand what you’re doing.
This article first appeared in The MagPi 73 and was written by Lucy Hattersley
Some beginners opt for taking physical photographs of their display, but due to the screen refresh this rarely looks good. It’s better to use software to grab the digital screen on the computer and save it as an image file. It’s pretty easy too.
You capture images on your Raspberry Pi using a built-in command-line program called Scrot. Alternatively, install a more advanced program called GNOME Screenshot (this is what we typically use). Once this software is installed, you can quickly capture your screen display.
STEP-01 Using Scrot
The easiest way to take a screenshot is using Scrot. This software comes with Raspbian so you don’t need to install anything.
If your keyboard has a PrtSc (Print Screen) key, then simply tap it. Scrot will capture an image of the desktop and save it to your home folder. Click on File Manager in the taskbar and double-click the .png file that starts with the date.

STEP-02 Scrot delay
You can also use Scrot from the command line. Enter scrot there to capture the whole screen (including the Terminal window). If you want to capture the screen without the Terminal window, you can set a delay (then close the Terminal window).
scrot -d 4
With the above command, Scrot will delay for four seconds before capturing the screen. Typically this is enough time to close down the Terminal window. Add a longer time if you want to arrange the display to include other items (such as menus).

STEP-03 Install GNOME Screenshot
Make sure your Raspberry Pi is connected to the internet. Click on Terminal in the taskbar to open a new Terminal window, and enter the following to update the software and install GNOME Screenshot:
sudo apt update && sudo apt upgrade
sudo apt install gnome-screenshot
Enter Y when prompted, to install the new software and upgrades.

STEP-04 Screen capture
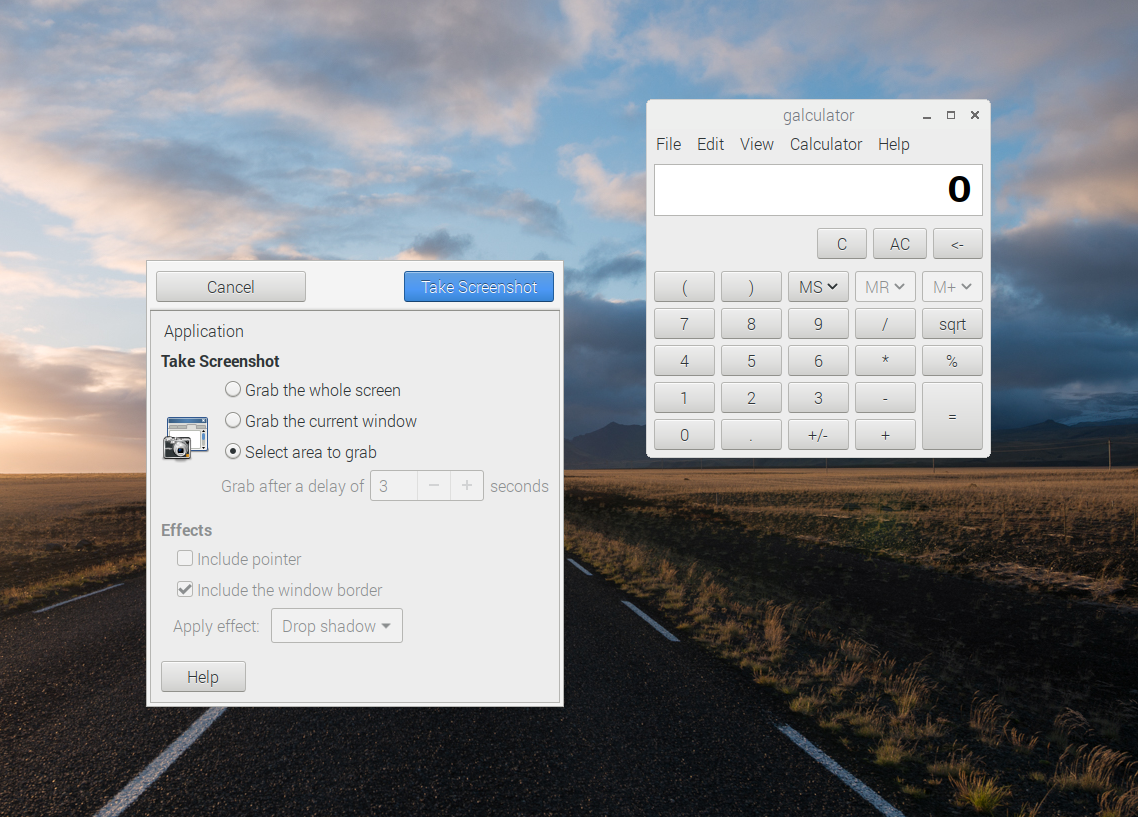
GNOME Screenshot provides you with a desktop interface for taking screenshots (along with a bunch of extra features). You’ll find it in Menu > Accessories > Screenshot. Click on Take Screenshot and the interface will vanish and a screen will be captured. Unlike Scrot, you get an interface allowing you to name the screenshot and decide where it will be saved. Click on Save to finish taking the screenshot.

STEP-05 Grab areas
You can focus on a particular part of the screen by capturing an area, rather than the whole screen. Click the radio button marked ‘Select area to grab’ and click Take Screenshot. The GNOME Screenshot interface will disappear. Now click and drag a marquee around the area you want to capture (in our case the Calculator app) and GNOME Screenshot will capture just that part of the screen.
STEP-06 Grab window
A more effective method is to grab individual windows. These can have effects added, such as drop shadows and borders to make them stand out. Choose the ‘Grab the current window’ radio button and choose ‘Drop shadow’ from the ‘Apply effect’ window. Make sure the window you want to capture is highlighted and click Take Screenshot. An image of the window, with the drop shadow effect, is saved.