
Recently, we saw how to connect the Lego Boost robotics set to the Raspberry Pi, and how to communicate with it in Python. This time we look at three example projects, where we explore the finer points of control that are normally hidden from you by the standard Lego software.
Click here to read Hack Lego Boost with Raspberry Pi.
This tutorial was written by Mike Cook and first appeared in The MagPi 81. Get a free Raspberry Pi computer & kit worth £20 with a 12-month print subscription to The MagPi.
The Lego Boost system communicates with a Move Hub that receives instructions, in real-time, over Bluetooth – it does not store its own set of instructions. So your model has to be in Bluetooth range all the time. This month we have three models to build, explore, and program. First, a simple but amusing use of the tilt sensor, then a machine to explore the performance of the colour sensor, and finally a colour sequence memory game. All parts for these projects can be built using the bricks that are included in the Lego Boost 17101 set.
Lego Boost Project 1: Eyes Front
We start with a very simple Lego build from the excellent book, The Lego Boost Idea Book, by Yoshihito Isogawa. It is a simple set of eyes that will always face to the front – well, in one dimension only. The idea is simple: measure the angle of the Hub and move the built-in motor to compensate for that movement. The Lego build is simple enough – see Figure 1.
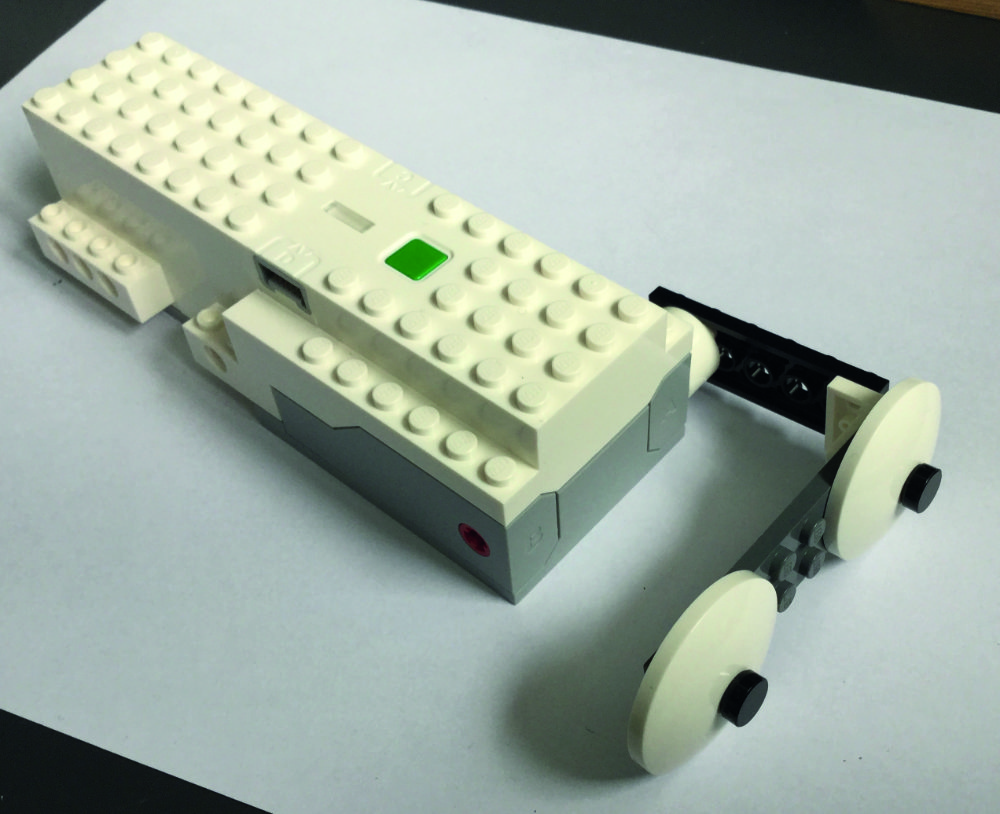
We also have full step-by-step pictorial build instructions on our GitHub repository. The code to drive it is simple, but not as simple as you might hope.
Eyes Front software
The Python code for driving this is shown in the Eyes_front.py listing, and the alternative Lego language code is shown in Figure 2.

It is interesting to note the difference in performance of the two code versions. The Lego language has a slow, hesitant movement, whereas the Python code has a much more robust feel about it. We did find that a straight translation from the graphics language into Python produced a system that would occasionally rotate outside the required parameters. This was caused by sending the motor commands too quickly – that is, before the previous one had finished. A small delay seemed to be the only cure.
#!/usr/bin/env python3
# coding=utf-8
# Eyes Front - move motor A to match tilt angle
# By Mike Cook March 2019

from time import sleep
from pylgbst import *
from pylgbst.movehub import MoveHub
from pylgbst.peripherals import TiltSensor

motorAngle = 0
tiltAngle = 0
shutDown = False

def main():
  print("Eyes front - move the eyes to the front")
  conn=get_connection_auto()
  print("Hub connected, press Green button to end")
  try:
    movehub = MoveHub(conn)
    setup(movehub)
    while not shutDown:
      adjust(movehub)

  finally:
    movehub.tilt_sensor.unsubscribe(callbackTilt)
    movehub.motor_A.unsubscribe(callback_A_angle)
    movehub.button.unsubscribe(call_button)
    conn.disconnect()

def setup(movehub):
   movehub.tilt_sensor.subscribe(callbackTilt, mode=TiltSensor.MODE_3AXIS_FULL, granularity=1)
   movehub.motor_A.subscribe(callback_A_angle, granularity=1)
   movehub.button.subscribe(call_button)

def adjust(movehub):
    maxA = 88 # maximum angle
    targetAngle = tiltAngle # so it won't change during this function
    if targetAngle > maxA: # limit target angle to approx +/- 90 Degrees
       targetAngle = maxA

    if targetAngle < -maxA:
       targetAngle = -maxA

    requiredMove = int(targetAngle - motorAngle) # amount required to move
    if abs(requiredMove) > 4: # to reduce jitter
       print("Moveing",requiredMove)
       movehub.motor_A.angled(requiredMove, 0.02)
       sleep(0.5)

def callbackTilt(roll, pitch, yaw):
    global tiltAngle
    #print("Tilt roll:%s pitch:%s yaw:%s" % (roll, pitch, yaw))
    tiltAngle = pitch * 1.4 # under reporting pitch

def callback_A_angle(param1):
   global motorAngle
   motorAngle = param1

def call_button(is_pressed):
   global shutDown
   if not is_pressed :
     print("Closing Down")
     shutDown = True

if __name__ == '__main__':
    main()
Lego Boost Project 2: The colour sensor
Next up, we wanted to make a game using coloured tiles and the colour sensors, but we ran into difficulties getting all the colours recognised at a fixed distance. We thought it was a shame we did not have some sort of machine to test the colour sensor’s performance, but then we remembered that this was Lego and we could build one! So the next project turned out to be a colour/distance sensor test bed, which proved to be fun and very interesting. The Lego model for this is shown in Figure 3, and step-by-step build instructions and software are again available on our GitHub repo.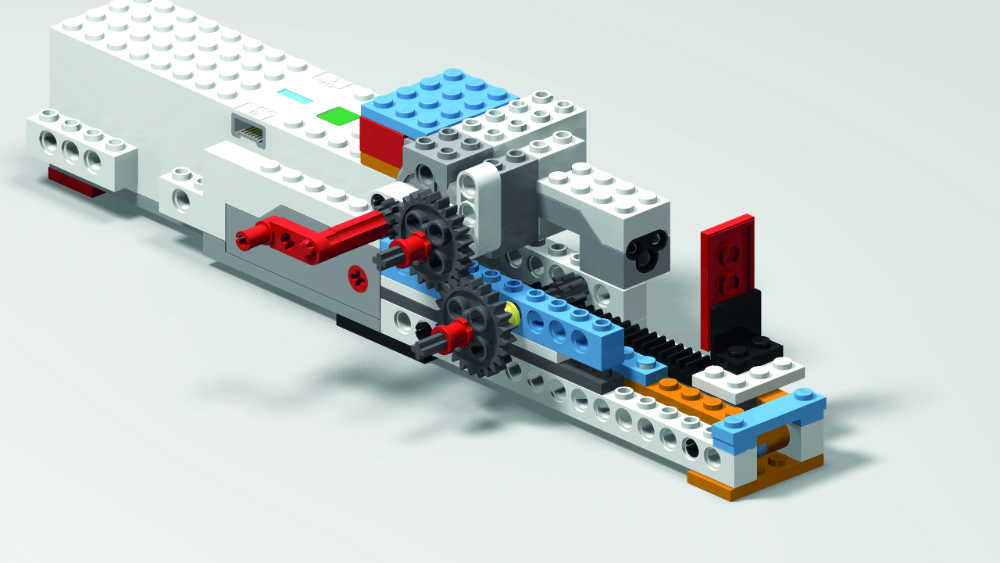
The colour sensor results
Each tile colour was tested, and the software produced a CSV file we could import into any spreadsheet software for analysis. There were a total of 149 readings for each tile, giving a grand total over the six colours of 894 readings – for each parameter, distance sensor, and colour number. The raw CSV files are again on our GitHub repo, but in summary it is fair to say that when the tile was at a range where the colour sensor worked, the distance sensor produced nonsense. The colour sensor’s performance is summarised in Figure 4; ‘not a colour’ is number 255 and is off the graph.
The colour sensor conclusions
At close distances, the sensor would produce readings of black or no colour – 0 or 255 – then there would be a range where the reported colour was wrong, or would change from reading to reading. Then you got a period where the colour was consistent, before going into the oscillating values again, and finally ending up as no colour. The takeaway information from this was that all colours were correct from 6.17 to 16.18 mm. That is a mid-range of 10.01 mm, therefore the optimal range is 11.175 mm; unfortunately, this is a half stud quantity, making it difficult to achieve with Lego.Lego Boost Project 3: Memory game
We know that ambient light will affect the colour sensor’s performance, so we set out to try to exclude as much of it as possible. The result is that we built a box around the sensor with a slot in the top where we could insert the appropriate 2×4 colour tile. This is shown in Figure 5 – again, full step-by-step instructions are on our GitHub repo. The only tile we had trouble with was the green one: it would not read when the smooth face was placed towards the sensor, but only the other way round. All the other tiles worked either way round.
Memory game software
The software for the Memory game is shown in the colour_memory.py listing. The colours of the current sequence are called out using the speech synthesizer eSpeak; if you don’t have this installed, then a simple:sudo apt install python3-espeak
From a Terminal window will install it. The sequence is also displayed on the Hub’s LED. Each time you get a sequence correct, an extra colour is added onto the end and getting a sequence wrong for three consecutive times results in that round being over. You can quit at any time using the Hub’s green button. The fact you have physical colour tiles makes the initial stages simple, as you can simply put them in the correct order.
#!/usr/bin/env python3
# coding=utf-8
# Colour Simon
# By Mike Cook March 2019

import time, random, os
from pylgbst import *
#import pylgbst
from pylgbst.movehub import MoveHub
from espeak import espeak  # sudo apt install python3-espeak
espeak.set_voice = 'en'

random.seed()
shutDown = False
lastColour = 255 ; updateColour = 0
maxLength = 25 # maximum sequence before we decide you are cheating
sequence = [ random.randint(0,3) for c in range(0,maxLength)]
maxFails = 3 # number of fails before game ends
playingColours = ["blue","green","yellow","red","white","black"]
translateColours = [5,5,5,0,5,1,5,2,5,3,4]
playingToLego = [3,5,7,9,10,0]

def main():
  global shutDown, movehub
  print("Colour tile Simon - press the green hub button to connect")
  conn=get_connection_auto()
  print("Trying to connect Hub")
  try:
    movehub = MoveHub(conn)
    print("Hub now connected - press Green button to end")
    init()
    espeak.synth("Colour Simon game")
    time.sleep(1)
    while not shutDown:
      fail = 0  # number of fails
      #generate new sequence
      for c in range(0,maxLength):
         sequence[c] = random.randint(0,4) #use five colours
      far = 2
      while fail < maxFails and not shutDown: # number of fail attempts before reset
         print("a sequence of length",far)
         saySeq(far)
         if getSeq(far) != -1 and not shutDown:# if entered sequence is correct
            far = far + 1
            if far <= maxLength:
               espeak.synth("yes")
               print("Yes - now try a longer one")
               time.sleep(1)
               espeak.synth("adding one more")
               time.sleep(1)
            fail = 0 # reset number of fails
         else:
             if not shutDown:
                fail = fail +1
                print("Wrong",fail,"fail")
                if fail < maxFails:
                   espeak.synth("no")
                   print("try that one again")
                   espeak.synth("try that one again")
                else :
                  print("maximum tries exceeded")
                  espeak.synth("maximum tries exceeded")
                  time.sleep(2)
                  espeak.synth("your score is")
                  time.sleep(1)
                  espeak.synth(str(far- 1))
                time.sleep(1.5)
         if far > maxLength and not shutDown:
            print("Well done Master Mind")
            espeak.synth("this is too easy for you")
            shutDown = True
      if not shutDown:
         espeak.synth("Game over")
         print("Game over - Your score is",far-1)
         print("Try again")
         time.sleep(2.0)
      else:
        espeak.synth("closing down  good bye")

  finally:
    print("shutting down")
    movehub.button.unsubscribe(call_button)
    movehub.color_distance_sensor.unsubscribe(callback_colour)
    conn.disconnect()

def init():
   movehub.led.set_color(playingToLego[5])
   movehub.button.subscribe(call_button)
   movehub.color_distance_sensor.subscribe(
callback_colour, granularity=0)

def getTile():
    global lastColour, updateColour
    while updateColour < 3 :
      if shutDown:
        return 5
    #print("colour",playingColours[correctColour    (lastColour)])
    updateColour = 0
    espeak.synth(playingColours[
correctColour   (lastColour)])
    movehub.led.set_color(playingToLego[
correctColour(lastColour)]) # turn on LED
    return correctColour(lastColour)

def saySeq(length):
    for num in range(0,length):
      espeak.synth(playingColours[sequence[num]])
      movehub.led.set_color(
playingToLego[sequence[num]])
      time.sleep(0.8) # time between saying colour
      movehub.led.set_color(playingToLego[5])
      time.sleep(0.5)

def getSeq(length):
    movehub.led.set_color(playingToLego[5]) # turn off LED
    espeak.synth("Now you try")
    print("Now you try")
    for press in range(0, length):
       if shutDown:
         return 1
       attempt = getTile()
       movehub.led.set_color(playingToLego[5]) # turn off LED
       if attempt != sequence[press]:
          time.sleep(0.8)
          return -1
    return 1

def callback_colour(colour, distance):
    global lastColour, updateColour
    if distance <= 1.2:
       if colour != 255 and lastColour != colour and colour!= 0: # ignore no colour
         updateColour += 1
         #print(colour)
         if updateColour > 2 :
             lastColour = colour
       if colour == 255 :
           lastColour = 255
    else:
       lastColour = 255

def correctColour(colour): # translate LEGO colours to playing colours
    if colour == 255:
      correctColour = 5 # black
    else:
      correctColour = translateColours[colour]
    return correctColour

def call_button(is_pressed):
   global shutDown, updateColour
   if not is_pressed :
     print("Closing Down")
     shutDown = True
     updateColour = 0

if __name__ == '__main__':
    main()
Customising the software
You can change the number of times you get to complete a sequence by changing the maxFails variable. Sometimes we think that three attempts is a bit much when the sequence gets long. Of course, you can simply write down the sequence, but that defeats the object of the game. The maxLength variable determines how long a sequence to generate before the program decides you are cheating and shuts down. You can comment out or simply turn off the audio if you want the sequence to be delivered in the form of the LED colour only. You could replace the synthesizer sounds with samples, for better quality.
Virtual Lego
The step-by-step instructions on our GitHub repo are generated by a free software application called Studio 2.0. This is a 3D CAD system that can be used to build a virtual Lego model, view it from all angles, and produce staggeringly realistic photographic-quality rendered images of your model. Figure 6 is the rendered version of the photograph we have in Figure 5. The application is written by BrickLink, and you can take your model and generate an order for exactly the bricks you want to generate the real thing, but this can be expensive.

Studio 2.0
Unfortunately, Studio 2.0 is not available for Linux, so you can’t run it on the Raspberry Pi, but there are Windows and macOS versions. It is actively being supported, unlike the older official Lego tool LDD (Lego Digital Designer) which seems to have been neglected recently – these older models can be imported into Studio 2.0. There are still some things that Studio 2.0 will not currently cope with, like flexible linkages, but no doubt they will appear in due course. See our GitHub repo for notes on setting up Studio 2.0 to get the missing Boost-specific parts like the Move Hub.
In conclusion
In the final part of this series, we will explore some of the things you can do to make music using the Lego Boost system.


