
The Raspberry Pi’s size and relative power enables it to be both a useful desktop computer, and one that you can slip in your pocket (if you really wanted to)
Picking up your Pi when you head out of the door is one thing; hooking it up to a monitor and keyboard and such is quite another. What if you could pick up your Pi and this was all attached? That would be a Pi laptop.
There are many ways you can create a Raspberry Pi laptop, such as custom builds, hardware recycling, and even just buying a laptop based on a Pi. Let’s get portable.
Make your own Raspberry Pi laptop
One of the first things people often remark on when seeing a Raspberry Pi is its size, and that goes double for the Pi Zero. Yet, despite their diminutive form factor, Pi boards can be surprisingly complex to convert into a usable laptop, mainly due to their rugged construction and connectors. Here, we’ll overcome some of the obstacles with a bit of clever design and create a useful, portable handheld computer.
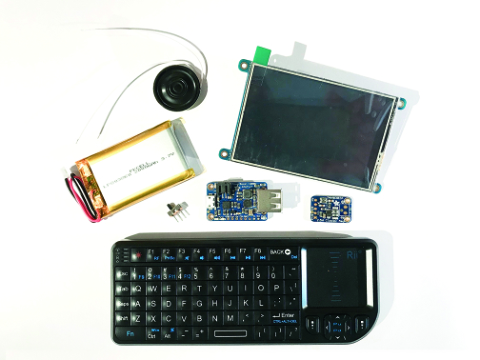
You'll need
- PiTFT 3.5″
- Riii miniature keyboard#
- PowerBoost 1000C
- 2000 mAh 3.7 V
- LiPo battery
- Mini metal speaker
- PAM8302 amplifier
- 3D printer (or use a service)
- SPDT switch
- Screws (4-40 and 2-56) and wires
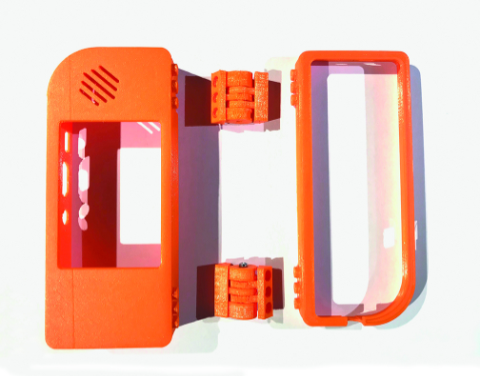
3D print the laptop case
This build is based on an Adafruit project, which provides 3D print files for the enclosure that are downloadable from here. Thingiverse can print them for you, but if you have a 3D printer to hand, you’re set. Expect about an eight-hour print time for all the parts.
Don’t worry about assembling the case just yet, but test everything out. Make sure the hinges fit ‘Lego-style’ to the case and slot together comfortably.
You can learn more about 3D printing and Raspberry Pi in The MagPi issue 69
Prepare the PiTFT
The PiTFT features a breakout of many of the Raspberry Pi’s GPIO pins. We can use this to provide power to the Pi. Bend all the breakout pins on the edge of the PiTFT as flat as you can, or snip them off, but not right to the base. Either connect jumpers, or solder wires, to pins 2 (5 V) and 6 (GND). Leave plenty of length.
Mount the battery
Wrap the battery in some duct tape to keep it safe, then lay it along the Pi, wires away from the USB and Ethernet ports. Now attach the PiTFT to the GPIO header of the Pi. You should end up with a battery ‘sandwich’ with the battery’s wires free of the assembly. Be careful that the battery is safely insulated from the Pi’s components.
Thread the wires and mount the speaker
Before you insert the assembly into the printed case, run two wires (one for positive, one negative) between the Pi and the PiTFT. Don’t worry about length: too much is a good idea at this stage. The speaker may need its wires extending to reach the amplifier at the other end of the casing. Once you’re happy, snap the speaker (carefully!) into the mount on the case and screw the PiTFT and Raspberry Pi to the four pillars around the screen aperture.
Hook up the sound
Using the pair of the wires you threaded through the Pi ‘sandwich’, solder them to the ‘Vin’ (positive) and ‘Gnd’ (negative) points on the amplifier. At the other end, following the circuit diagram (Figure 1), solder the same pair to the ground and 5 V lines on the PowerBoost, shortening as required.
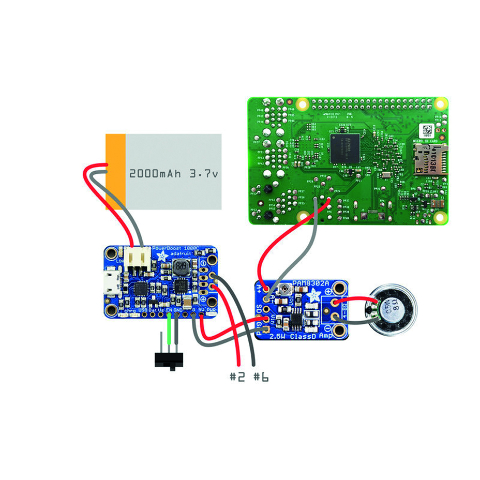
Next, connect the speaker’s wires to the amplifier’s output. You may need to extend them to fit. Finally, and very carefully, solder two wires from the A+ and A- lines on the amplifier to the Raspberry Pi board, as shown in Figure 1.
Attach the Power
The PowerBoost will deliver power to the whole system from the battery and also manage recharging. We’re powering the Pi through the PiTFT, so using the wires we soldered on to it earlier, connect them to the PowerBoost as shown in Figure 1, having shortened the wires to fit.
Solder two further wires to EN and GND on the PowerBoost. These need to connect to the SPDT switch. Thread the wires through the opening for the switch, solder one to the centre pin and another to one of the sides.

Install the Software
Before going any further, get your operating system ready to go. Raspbian can’t talk to the PiTFT by default, so connect a screen, keyboard and mouse, prep your microSD card with the latest version of Raspbian, and use the Terminal commands listed at magpi.cc/XaeUem to install the necessary software to drive the screen. You need to set the screen to rotate 270° and to mirror the HDMI output. Once rebooted, your PiTFT will come to life.
Main body assembly
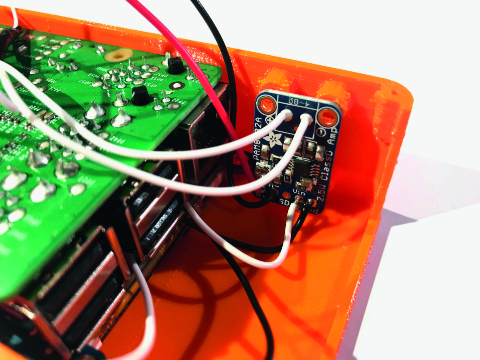
Carefully secure the amplifier with 4-40 machine screws. Lay the case back alongside the main body and screw in the PowerBoost. Attach the battery (and then switch off if everything comes to life). Insert a USB WiFi adapter (if required) and the USB receiver for the keyboard. Tuck all the wires away carefully, looking out for shorts. Push the switch into the clips provided. Now place the back cover over the main body and secure with 2-56 machine screws.
Final assembly
It’s time to finish everything off. Snap the keyboard into the printed mount. Having checked everything fits and double-checked orientation, glue the hinges to the body and keyboard mount, then allow to dry. Push the hinges together, then secure each with long machine screws.
Check all the ports line up. Turn on the keyboard, flick the power switch, and after a few seconds the screen should come to life. Congratulations, you have a handheld, rechargeable Raspberry Pi.

Using your laptop Pi
Although the screen is great for gaming, we wouldn’t recommend writing your next great novel on it. That said, the density of the screen makes it comfortable for a bit of web browsing or using the Terminal. The bonus of audio makes for a cool little radio too.
You can power the system using the usual connector on the Pi, but this will not charge the battery. Instead, connect to the micro USB port at the base on the main unit. Don’t forget, you’ll need to keep the keyboard topped up too.
If you find the Raspberry Pi does not appear to be shutting down correctly, don’t worry. The screen does not refresh correctly on shutdown so appears to freeze. Just wait a few seconds, then switch off.


