
The Lego Boost is designed to be run from an app on an Android or iPad tablet, using a graphics programming language not unlike Scratch. It makes a good job of this and is easy for kids to pick up, but these sorts of languages have their limitations. They can be inflexible and difficult to read, especially as the code gets bigger. By using Python, much more complex programs can created, many that are not possible with graphics-based code. So, give your Boost a boost by letting Python do the controlling.
This article was written by Mike Cook and first appeared in The MagPi issue 80. Subscribe to our newsletter to get a free digital edition of The MagPi delivered to your inbox every month. Or subscribe in print to get The MagPi magazine delivered to your door. Mike is a veteran magazine author from the old days, writer of the Body Build series, plus co-author of Raspberry Pi for Dummies, Raspberry Pi Projects, and Raspberry Pi Projects for Dummies.
See also:
https://www.raspberrypi.org/magpi/three-lego-boost-raspberry-pi-projects/
What is Lego’s Boost?
Unlike the previous Mindstorms robotics systems from Lego, the Boost system has no controlling brick to run code – instead, instructions representing the program are sent one at a time directly, over Bluetooth, in real-time to the Move Hub. This has built-in motors, LEDs, tilt sensor, and push-button. You can also plug into the Hub a smaller motor and a distance sensor or colour sensor. Also, Mindstorms uses Lego Technic beams for most constructions, known as a studless system, whereas the Boost uses the more conventional, studful brick form of construction. See Figure 1.

Lego’s software
The standard Lego software provides a good structured learning system where the user builds a bit, programs it, and then moves on to building more. The big project is Vernie the robot and we’d recommend you do this first because the parts are already bagged up to make construction of this project easy. Vernie is built up in stages and the code you are asked to run at each stage gets increasingly complex. You can’t progress to the next level without trying, or pretending to try, the current phase. We recommend you try this first, not least for the firmware updates it can offer to your Hub – see Figure 2.

Hack a Lego boost: kit you'll need
- Lego 17101 Boost Creative Toolbox
- Raspberry Pi 3/3B+/3A+/Zero W
Set up a Lego Boost with Raspberry Pi
There are a few libraries for connecting Boost to Python – see a summary from Jorge Pe, author of the original library. He hacked the system by using a Bluetooth protocol sniffer. These days, Lego has released the protocol documentation, but it’s a heavy read. We tried a few libraries and it seems the most developed and actively supported one is pylgbst from Andrey Pokhilko. In fact, during the course of writing this, a new version was released. It is still not finished but, with a little tweaking, it is good.


Installing the pylgbst library
First off, we need to install some dependences. Open a Terminal window and enter:
sudo apt-get install python3-pip
sudo pip3 install pexpect
sudo pip3 install pygatt
Next, get the library:
wget https://github.com/undera/pylgbst/archive/master.zip
unzip master.zip
cd pylgbst-master
sudo python3 setup.py install
Fixing the colours
There seems to be an error in one of the files defining the colours for the RGB LED. Fix this by opening a Terminal and entering:
sudo nano /usr/local/lib/python3.5/dist-packages/pylgbst/constants.py
Scroll down using the cursor keys until you see:
COLOR_ORANGE = 0x09
…and change it to:
COLOR_ORANGE = 0x08
To save the changes, press CTRL+X, then Y, and ENTER.
Documentation
The bulk of the documentation is in the README.md file and we found that not all of it works with the Raspberry Pi. But, it does contain some short single-function examples. Basically, to get the Move Hub to do things, you send it a command, as you might expect; however, to get information back from the Move Hub, you have to subscribe to the appropriate stream. When you do, you specify the name of a function that will be called when there is new data from whatever sensor you subscribed from. You must unsubscribe from the sensor before your Python program finishes.
Demo example
In the library’s examples folder is a demo.py program; unfortunately, this will not run without error as is – it seems to be more designed for fault finding on the Bluetooth connections than showing things working. We have rewritten this to add extra functions and correct the syntax errors – see the mike’s_demo.py listing. While it will run with any Move Hub, incorporated into a model or not, we found it best to use a basic setup that didn’t run away off the desk when the motors moved. Also, adding wheels to the motors made it easy to turn them when testing the motor read angle function.
Preparing the Hub
Refer to Figures 3 to 5 with these instructions. Get the Move Hub and fix on top of it the sensor (part 6182145) and the motor (part 6181852) and plug them into ports C and D. It doesn’t matter which port you use, the software will find them. Next, put a red axle stub (part 4142865) in each of the two Hub motors, and the external motor. Fit a wheel (part 4662228) on each of the Move Hub’s axles, and a wheel and tyre (parts 6092256 and 4619323) onto the external motor. Finally, add two long beams (part 4508661) under the hub to stop the wheels from moving it.
Running Mike’s demo
Make sure Bluetooth is turned on by clicking on the Bluetooth icon on the top menu bar, run the Python code, and immediately push the green button on the Move Hub. The LED next to this will start flashing to indicate that the Bluetooth Hub is looking for something to pair with. This will turn a steady blue when connected and the demo will then start, printing out instructions on the screen. After the battery’s voltage and current have been read out, the program will ask you to press the green button; you need to do this for the program to advance.
More demo instructions
After the green button is pressed, the distance sensor is tested; this repeats for 100 measurements. You can change the distance sensor reading by waving your hand in front of it: it returns a value in inches, to the nearest inch, for distances above one inch; for smaller distances, it returns finer values. The program converts this into millimetres for display. The tilt sensor tests require you to pick up and turn the Hub, and the motor angle read requires you to turn the motor wheels by hand. When no movement of the wheels has been detected over the last five seconds, the demo ends.
Further examples
The library’s examples folder also contains other examples. Unfortunately, they don’t work on the Raspberry Pi due to the method used to include packages. The from . import * line, which means from the current directory import everything, returns an error message saying the parent directory is missing. This might have something to do with the author not using a Raspberry Pi in his testing. Note, there is another problem but this is down to Lego, as it also happens on the tablets running the official software. Colours set or reported as cyan are actually green, so we have to cope with this in our code.
Move Hub connection problems
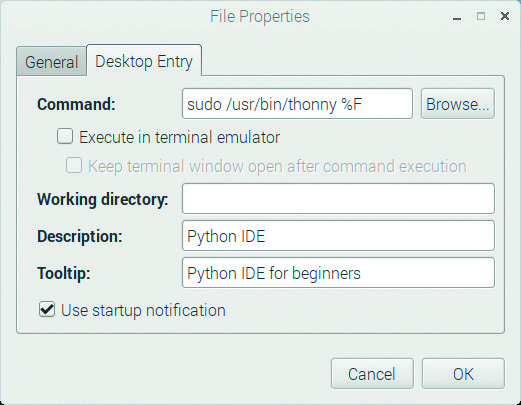
Here at the Bakery we have two Raspberry Pi boards: one with the current Raspbian release, and the other the previous one. Oddly enough, we found that running normally was fine with the older release, but with the newer one the code needed to be run in supervisor mode in order for it to connect. This can be done by typing sudo IDLE3 in a Terminal window. If you want to permanently run IDLE in the supervisor mode from the desktop, go to the IDLE 3 menu entry, and right-click. Then choose the Properties menu, and select the Desktop Entry tab. Now edit the command box to put ‘sudo ’ in front of what is there. The same applies for Thonny – see Figure 6.

Lego Boost conclusion
Now we’ve got the basics going, we’re all ready to do some interesting stuff. In The MagPi magazine issue 81, we’ll make a game showing how we can use our Lego Boost with the Pygame framework.
# #!/usr/bin/env python3
# coding=utf-8
# Mike's Demo - put the LEGO Boost trough its paces
# By Andrey Pokhilko & Mike Cook Feb 2019

from time import sleep
import time
from pylgbst import *
from pylgbst.movehub import MoveHub, COLORS
from pylgbst.peripherals import EncodedMotor, TiltSensor, Amperage, Voltage

def main():
  print("Mike's Demo - put the LEGO Boost trough its paces")
  conn=get_connection_auto()
  try:
    movehub = MoveHub(conn)
    demo_voltage(movehub)
    demo_button(movehub)
    demo_led_colors(movehub)
    demo_motors_timed(movehub)
    demo_motors_angled(movehub)
    demo_port_cd_motor(movehub)
    demo_tilt_sensor_simple(movehub)
    demo_tilt_sensor_precise(movehub)
    demo_color_sensor(movehub)
    demo_motor_sensors(movehub)
    sleep(1)
    print("That's all folks")
  finally:
    conn.disconnect()

def demo_voltage(movehub):
    print("Reading voltage & current for a short time")
    def callback1(value):
        print("Amperage: %.3f" % value)

    def callback2(value):
        print("Voltage: %.3f" % value)

    movehub.amperage.subscribe(callback1, mode=Amperage.MODE1, granularity=0)
    movehub.amperage.subscribe(callback1, mode=Amperage.MODE1, granularity=1)

    movehub.voltage.subscribe(callback2, mode=Voltage.MODE1, granularity=0)
    movehub.voltage.subscribe(callback2, mode=Voltage.MODE1, granularity=1)
    sleep(5)
    movehub.amperage.unsubscribe(callback1)
    movehub.voltage.unsubscribe(callback2)

def demo_button(movehub):
    global notPressed
    print("Please press the green button")
    notPressed = True

    def call_button(is_pressed):
        global notPressed
        if is_pressed :
           print("Thank you button pressed")
        else:
          print("Now it is released")
          notPressed = False

    movehub.button.subscribe(call_button)
    while notPressed:
        sleep(0.4)
    sleep(0.4)
    movehub.button.unsubscribe(call_button)

def demo_led_colors(movehub):
    # LED colors demo
    print("LED colours demo")
    for colour in range(1,11):
        print("Setting LED colour to: %s" % COLORS[colour])
        movehub.led.set_color(colour)
        sleep(1)

def demo_motors_timed(movehub):
    print("Motors movement demo: timed")
    for level in range(0, 101, 10):
        levels = level / 100.0
        print(" Speed level: %s" %  levels)
        movehub.motor_A.timed(0.2, levels)
        movehub.motor_B.timed(0.2, -levels)
    print("now moveing both motors with one command")
    movehub.motor_AB.timed(1.5, -0.2, 0.2)
    movehub.motor_AB.timed(0.5, 1)
    movehub.motor_AB.timed(0.5, -1)


def demo_motors_angled(movehub):
    print("Motors movement demo: angled")
    for angle in range(0, 361, 90):
        print("Angle: %s" % angle)
        movehub.motor_B.angled(angle, 1)
        sleep(1)
        movehub.motor_B.angled(angle, -1)
        sleep(1)

    movehub.motor_AB.angled(360, 1, -1)
    sleep(1)
    movehub.motor_AB.angled(360, -1, 1)
    sleep(1)


def demo_port_cd_motor(movehub): # Move motor on port C or D
    print("Move external motor on Port C or D 45 degrees left & right")
    motor = None
    if isinstance(movehub.port_D, EncodedMotor):
        print("Rotation motor is on port D")
        motor = movehub.port_D
    elif isinstance(movehub.port_C, EncodedMotor):
        print("Rotation motor is on port C")
        motor = movehub.port_C
    else:
        print("Motor not found on ports C or D")
    if motor:
        print("Left")
        motor.angled(45, 0.3)
        sleep(3)
        motor.angled(45, -0.3)
        sleep(1)

        print("Right")
        motor.angled(45, -0.1)
        sleep(2)
        motor.angled(45, 0.1)
        sleep(1)

def demo_tilt_sensor_simple(movehub):
    print("Tilt sensor simple test. Turn Hub in different ways.")
    demo_tilt_sensor_simple.cnt = 0
    limit = 10 # number of times to take a reading

    def callback(state):
        demo_tilt_sensor_simple.cnt += 1
        print("Tilt # %s of %s: %s=%s" % (
demo_tilt_sensor_simple.cnt, limit, TiltSensor.TRI_STATES[state], state))

    movehub.tilt_sensor.subscribe(callback, mode=TiltSensor.MODE_3AXIS_SIMPLE)
    while demo_tilt_sensor_simple.cnt < limit:
        sleep(1)
    movehub.tilt_sensor.unsubscribe(callback)

def demo_tilt_sensor_precise(movehub):
    print("Tilt sensor precise test. Turn device in different ways.")
    demo_tilt_sensor_simple.cnt = 0
    limit = 50

    def callbackTilt(roll, pitch, yaw):
        demo_tilt_sensor_simple.cnt += 1
        print(
"Tilt #%s of %s: roll:%s pitch:%s yaw:%s" % (demo_tilt_sensor_simple.cnt, limit, roll,pitch,yaw))

    # granularity = 3 - only fire callback function when results change by 3 or more
    movehub.tilt_sensor.subscribe(callbackTilt, mode=TiltSensor.MODE_3AXIS_FULL, granularity=3)
    while demo_tilt_sensor_simple.cnt < limit:
        sleep(1)
    movehub.tilt_sensor.unsubscribe(callbackTilt)

def callback_color(color, distance=None): # returns to nearest for distances > 1 inch
    global limit
    demo_color_sensor.cnt += 1
    correctColor = color
    if color == 5: # to correct for error in sensor
        correctColor = 6
    if distance != None:
       metric = distance * 2.45  # distance in mm
    else:
      metric = 0
    print('#%s/%s: Colour %s, distance %.2fmm' % (
demo_color_sensor.cnt, limit, COLORS[correctColor], metric))

def demo_color_sensor(movehub):
    global limit
    print("Colour & distance sensor test: wave your hand in front of it")
    demo_color_sensor.cnt = 0
    limit = 100 # number of times to take a reading
    try:
        movehub.color_distance_sensor.subscribe(callback_color)
    except:
       print("No colour & distance sensor found")
       sleep(2)
       return
    while demo_color_sensor.cnt < limit:
        sleep(0.5)
    # sometimes gives a warning - not sure why
    movehub.color_distance_sensor.unsubscribe(
callback_color)

def demo_motor_sensors(movehub):
    global resetTimeout, posA, posB, posE
    testTime = 5
    print("Motor rotation sensors test, move by hand any motor")
    print("Test ends after %s seconds with no change" % testTime)
    print()
    demo_motor_sensors.states =
{movehub.motor_A: None, movehub.motor_B: None}
    resetTimeout = False ; external = False
    posA = 0 ; posB = 0 ; posE = 0

    def callback_a(param1):
        global resetTimeout,posA
        last_a = demo_motor_sensors.states[movehub.motor_A]
        if last_a != param1:
           resetTimeout = True
        demo_motor_sensors.states[movehub.motor_A] = param1
        posA = param1

    def callback_b(param1):
        global resetTimeout,posB
        last_b = demo_motor_sensors.states[
movehub.motor_B]
        if last_b != param1:
           resetTimeout = True
        demo_motor_sensors.states[movehub.motor_B] = param1
        posB = param1

    def callback_e(param1):
        global resetTimeout,posE
        last_e = demo_motor_sensors.states[
movehub.motor_external]
        if last_e != param1:
           resetTimeout = True
        demo_motor_sensors.states[
movehub.motor_external] = param1
        posE = param1

    movehub.motor_A.subscribe(callback_a)
    movehub.motor_B.subscribe(callback_b)
    external = False

    if movehub.motor_external is not None:
        demo_motor_sensors.states[
movehub.motor_external] = None
        external = True
        movehub.motor_external.subscribe(callback_e)

    timeOut = time.time() + testTime
    while timeOut > time.time():
      if resetTimeout :
         if external :
            print(
"Motor A position %s \t Motor B position %s \t External Motor position %s" % (posA, posB, posE))
         else:
            print("Motor A position %s \t Motor B position %s " % (posA, posB))
         timeOut = time.time() + testTime
         resetTimeout = False

    movehub.motor_A.unsubscribe(callback_a)
    movehub.motor_B.unsubscribe(callback_b)

    if movehub.motor_external is not None:
        demo_motor_sensors.states[
movehub.motor_external] = None
        movehub.motor_external.unsubscribe(callback_e)

if __name__ == '__main__':
    main()


