It’s easy to use a Raspberry Pi as a Samba file server where you can store backups and share files from all the other computers on your network.
Samba is the Linux implementation of the SMB/CIFS file sharing standard used by Windows PCs and Apple computers, and widely supported by media streamers, games consoles and mobile apps. With Samba activated you can quickly copy files from a computer on your network to a Raspberry using wireless LAN (or a direct Ethernet connection).
Get a free Pi Zero W, official case, and accessories with a 12-month subscription to The MagPi.
You might also like:
- Raspberry Pi 3B+: meet the new member of the family
- Easy retro gaming on a Raspberry Pi with Lakka and NOOBS
- Make a Pi Zero W Smart USB flash drive
- Apache web server: Build a local HTML server with a Raspberry Pi
Set up Samba on a Raspberry Pi
This tutorial assumes that you’ll use a keyboard, mouse, and monitor to set up your file server, but you can alternatively enable SSH and connect to it remotely from another computer on your local network.
We also assume you’re using a 32GB (or smaller) micro SD card, which provides a reasonable amount of storage space without requiring any extra steps to make it accessible. However, if you need extra storage, it’s easy to mount a large external USB drive and create a Samba entry for it.
Alternatively, if you want to keep things compact, you can install Raspbian on micro SD cards of up to 256GB, although we suggest checking online (non-working SD cards) before you buy to make sure you get one that’s fully compatible with the Raspberry Pi.
Once set up, you can mount your home file server on all the other computers on your network, and use it as a convenient place to store everything from music files you want to share with your housemates, to backups of important documents and save-game files you’d like to share between computers.
We recommend using a wired Ethernet connection for stability and fast transfer speeds. The project will still work if you connect your Pi via WiFi, although performance will be affected, particularly when it comes to copying over large files.
File Server: Set up Samba
Download the latest version of NOOBS and copy it to a blank micro SD card that’s been formatted as fat32. Plug the micro SD card into your Pi, boot it up and opt to install Raspbian with a PIXEL desktop.
Install Samba
Samba is available in Raspbian’s standard software repositories. We’re going to update our repository index, make sure our operating system is fully updated, and install Samba using apt-get. Open a Terminal and type:
sudo apt-get update

sudo apt-get upgrade

sudo apt-get install samba samba-common-bin
Create your shared directory
We’re going to create a dedicated shared directory on our Pi’s micro SD hard disk. You can put it anywhere, but ours will be at the top level of the root file system.
sudo mkdir -m 1777 /shareThis command sets the sticky bit (1) to help prevent the directory from being accidentally deleted and gives everyone read/write/execute (777) permissions on it.
Configure Samba to share your new directory
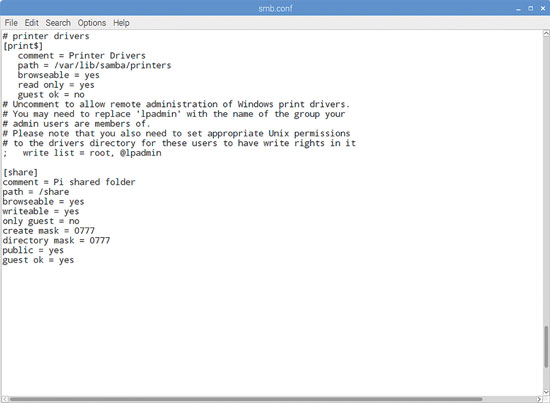
Edit Samba’s config files to make the file share visible to the Windows PCs on the network.
sudo leafpad /etc/samba/smb.conf
In our example, you’ll need to add the following entry:
[share]
Comment = Pi shared folder
Path = /share
Browseable = yes
Writeable = Yes
only guest = no
create mask = 0777
directory mask = 0777
Public = yes
Guest ok = yes
This means that anyone will be able to read, write, and execute files in the share, either by logging in as a Samba user (which we’ll set up below) or as a guest. If you don’t want to allow guest users, omit the guest ok = yes line.
You could also use Samba to share a user’s home directory so they can access it from elsewhere on the network, or to share a larger external hard disk that lives at a fixed mount point. Just create a smb.conf entry for any path you want to share, and it’ll be made available across your network when you restart Samba.
Create a user and start Samba
Before we start the server, you’ll want to set a Samba password - this is not the same as your standard default password (raspberry), but there’s no harm in reusing this if you want to, as this is a low-security, local network project.
sudo smbpasswd -a piThen set a password as prompted. Finally, let’s restart Samba:
sudo /etc/init.d/samba restart
From now on, Samba will start automatically whenever you power on your Pi. Once you’ve made sure that you can locate your shared folder on the network, you can safely disconnect the mouse, monitor, and keyboard from your Pi and just leave it running as a headless file server.
Find your Pi on the network
You’ll now be able to find your Raspberry Pi file server (named RASPBERRYPI by default) from any device on your local network. If you’ve left smb.conf’s default settings as they are, it will appear in a Windows network workgroup called WORKGROUP.
Subscribe and never miss an issue

Get a a brand new Raspberry Pi Zero W, a case for it, and a selection of adapter cables with a twelve-month print subscription to The MagPi!


