
Coral’s new USB Accelerator lets you to build AI capabilities into any Raspberry Pi project. The accelerator is built around Google’s Edge TPU chip, an ASIC that greatly speeds up neural network performance on-device.
In this tutorial we’re going to build a Teachable Machine. This project was designed by Google’s Mike Tyka.
This project first appeared in The MagPi issue 79. Subscribe to The MagPi magazine and get a free Raspberry Pi.
When combined with the Raspberry Pi and Raspberry Pi Camera, you have a complete system that’s perfect for executing complex computer vision tasks like object recognition. Since the Accelerator operates locally, you do not need to connect to a cloud service or share secure data over the internet. It also runs with less latency than a cloud connection, performing object detection in near real time.
Using the Raspberry Pi Camera Module, all Raspberry Pi boards can easily gain photographic functionality. And with its built-in GPIO pins, you can prototype circuits and even integrate the Raspberry Pi into projects and industrial environments. Throw a USB Accelerator into the mix and you have a capable AI device, ready to take on all kinds of tasks.
The Teachable Machine learns to identify objects held up in front of it. These objects can be anything: keys, fruit, chess pieces, or even fingers or faces.
The user holds up items in front of the Raspberry Pi Camera Module and presses a button on the Teachable Machine. The device then remembers the object being held up – if it sees it again, it will light up the corresponding LED.
The Teachable Machine is a great example of how to add a layer of machine learning technology sparkle to your projects without having to train a whole network from scratch.
The Teachable Machine can distinguish objects quickly and effectively (even from different orientations). This sort of project wasn’t possible even a few years ago on a powerful computer with an expensive graphics card. And now we can add it to a small single-board Raspberry Pi computer.
Teachable Machine Maker: Mike Tyka
Mike works with artificial neural networks as an artistic medium and tool. He created some of the first large-scale artworks using Iterative DeepDream and collaborated with Refik Anadol to create pioneering immersive projection installations using Generative Adversarial Networks called Archive Dreaming. Mike currently works on machine learning at Google in Seattle.
Start with Raspbian
Start by flashing a fresh installation of Raspbian Stretch with Desktop to a microSD card (QuickStart Guide).
Set up your Pi with the Raspberry Pi Camera Module attached to the camera socket via a 15‑way ribbon cable and insert the microSD card. Add power to start up the Raspberry Pi.
Set up the camera
When the Raspbian OS boots, click the Raspberry Pi menu icon in the top-left and choose Preferences > Raspberry Pi Configuration.
Click Interfaces and set Camera to Enabled and click OK. A ‘Reboot needed’ alert will appear; click Yes.
Open a Terminal window (CTRL+ALT+T) and take a test shot and open it:
raspistill -v -o test.jpg
xdg-open /home/pi/test.jpg
Set up USB Accelerator
Make sure the USB Accelerator device is not connected while you set it up (disconnect the device if you plugged it in). Open a Terminal and enter these commands to download and install the software:
wget http://storage.googleapis.com/cloud-iot-edge-pretrained-models/edgetpu_api.tar.gz
tar xzf edgetpu_api.tar.gz
cd python-tflite-source
bash ./install.sh
During the installation, it will say: ‘Would you like to enable the maximum operating frequency?’ Answer ‘n’ for now. You can enable it later if you want to increase the performance.

Test USB Accelerator
Now plug in the USB Accelerator using the supplied USB Type-A to USB Type-C cable. Your USB Accelerator is now set up.
See Coral’s ‘Get started with the USB Accelerator’ document for more information on setting up and testing: g.co/coral/setup.
Download a model
Let’s take a look at the included demo code. The classify_capture.py script works with the Raspberry Pi Camera Module to perform live image classification of objects around us.
What’s needed is a model trained to detect some commonplace objects. Download this MobileNet model trained to recognise 1000 objects:
wget -P testdata/ https://storage.googleapis.com/cloud-iot-edge-pretrained-models/cannedmodels/mobilenetv21.0224quant_edgetpu.tflite
Now get the corresponding labels:
wget -P testdata/ http://storage.googleapis.com/cloud-iot-edge-pretrained-models/cannedmodels/imagenet_labels.txt
This model and label set can be found (along with many other models) on the Coral website.
Live camera detection
We now have a pre-trained model for 1000 objects and a corresponding label set, plus a live capture camera script. Put all three together and you can run an object-detecting camera.
python3 demo/classifycapture.py --model testdata/mobilenetv21.0224quantedgetpu.tflite --label testdata/imagenet_labels.txt
Move the Raspberry Pi Camera Module around the room and the preview window will identify the objects around you: laptop, mouse, soda can, and so on.
The classify_capture.py program uses two options:
--model
--label
And each one links to the model and corresponding labels downloaded earlier.
This is a TensorFlow Lite model (hence the .tflite extension) that has been pre-trained to detect 1000 objects. Typically, training will have taken place on a much faster computer, or cloud service, using thousands of train and test images. During training, the model gradually gets better at matching the images to the label list. When it’s good enough, we use it on the Raspberry Pi.
The Teachable Machine
It’s time to bring the technology together to build something. We’re going to build the Teachable Machine project. Like our Classify Capture demo, it scans for objects using the Raspberry Pi Camera Module. However, the Teachable Machine learns to detect the objects you are holding up in front of it.
Start by installing the additional dependencies:
sudo apt-get install libgstreamer1.0-0 gstreamer1.0-tools gstreamer1.0-plugins-base gstreamer1.0-plugins-good gstreamer1.0-plugins-bad gstreamer1.0-plugins-ugly python3-gst-1.0 python3-gi
Now add bcm2835-v4l2 to the end of /etc/modules:
echo bcm2835-v4l2 | sudo tee -a /etc/modules
Set up the Teachable Machine
Turn off the Raspberry Pi with this Terminal command (or choose Menu > Shutdown and click Shutdown):
sudo shutdown -h now
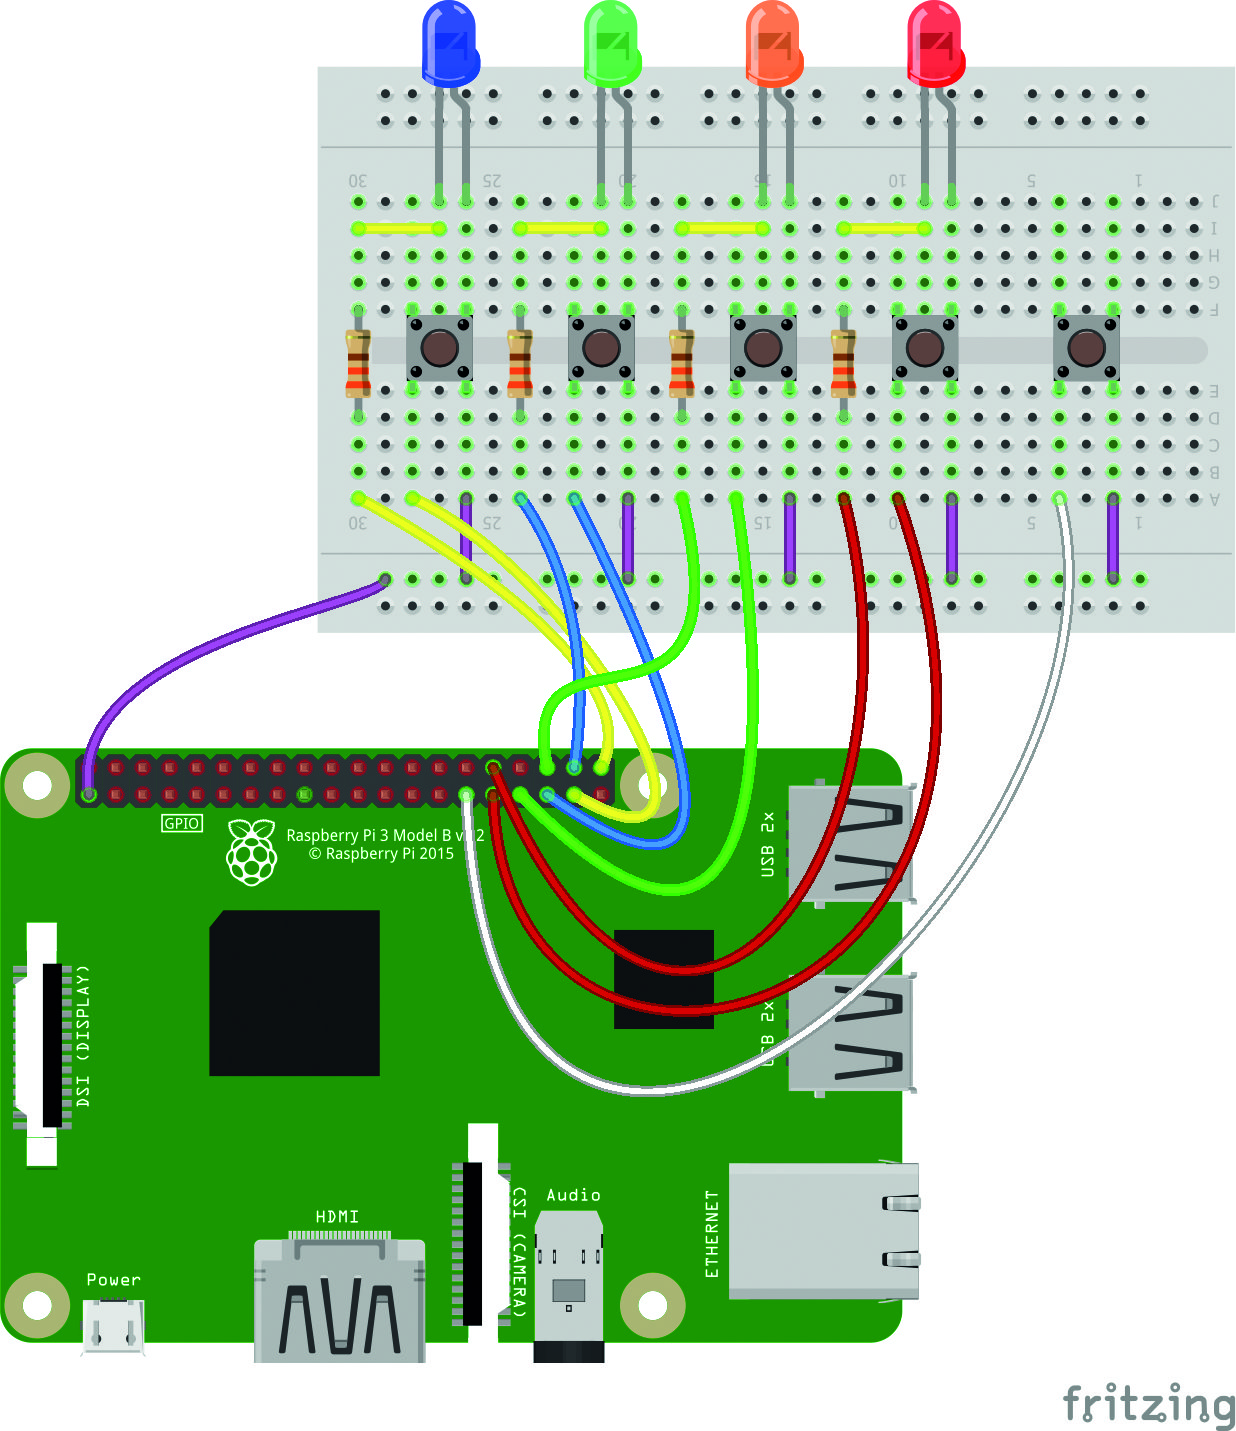
Remove the power from the Raspberry Pi and set up the Teachable Machine breadboard with the switches and LEDs as shown in the circuit diagram (Figure 1). We find it best to lay the Raspberry Pi Camera Module flat on a surface so it is pointing upwards.
Reattach the power once the circuit is set up.
Install the code
Open the Chromium browser and visit The MagPi GitHub page. Download the teachable_rpi3.tgz file from there to your home folder. Open a Terminal window and extract the code:
tar xvzf teachable_rpi3.tgz
cd /home/pi/teachable/
All the code needed to run the Teachable Machine is found (and is run from) this directory. The embedding.py code listing demonstrates the most critical parts. Enter this code to test out the circuit:
sudo python3 teachable.py --testui
The LEDs will flash to indicate that the circuit is working. Press the buttons and the Terminal will display which button is working (between 0 and 4).
Press CTRL+C to interrupt the program.
Run the Teachable Machine
Now it’s time to run our Teachable Machine and see what it is capable of doing. Enter:
sh run.sh
The Teachable Machine will initialise its model and start running. The LED in the USB Accelerator should be glowing and the Terminal will display a frame rate (typically around 30 fps). Hold an item (such as a piece of fruit or a computer mouse) above the camera and press one of the buttons that’s paired with an LED (the LED will light up next to the button). Let go of the button and move the item away.
Now, when you bring the item back in front of the camera, the corresponding LED will light up. Keep bringing different items in front of the camera and pressing different buttons to train the machine to detect each one. It’s helpful to dedicate one button to just background (with no item held).
If the Teachable Machine seems a little unsure, you can always press the button again to retrain it. It is good practice to press the button multiple times and rotate the object slightly with each press.
Have fun playing around with different items. Press the fifth button (reset) to clear all the items from memory.


